Instructions:
1. Make the Chocolate Sponge Cake:
• Preheat the oven to 350°F (175°C). Line a 10×15-inch jelly roll pan with parchment paper and lightly grease the sides to ensure easy removal of the cake after baking.
• Beat the eggs: In a large mixing bowl, whisk the 4 eggs with the granulated sugar using an electric mixer or a hand whisk. Beat on medium-high speed for about 5-7 minutes until the mixture becomes thick, pale, and doubles in volume. This process is essential for achieving a light and airy sponge.
• Add dry ingredients: In a separate bowl, sift together the flour, cocoa powder, and salt. Gently fold the dry ingredients into the egg mixture using a spatula. Be careful not to deflate the batter to preserve the fluffiness.
• Bake the cake: Pour the batter into the prepared jelly roll pan and spread it evenly. Bake for 10-12 minutes, or until the cake is springy to the touch, and a toothpick inserted into the center comes out clean.
• Cool the cake: Once baked, remove the cake from the oven and immediately turn it out onto a clean kitchen towel dusted with powdered sugar. Carefully peel off the parchment paper. While the cake is still warm, roll it up with the towel to help maintain its shape as it cools. Let it cool completely while rolled to preserve the texture.
2. Prepare the Filling:
• Whip the cream: In a chilled mixing bowl, beat the heavy cream and powdered sugar together until soft peaks form. Be careful not to overwhip the cream, as it should remain light and airy for the perfect filling.
• Prepare the cherry filling: If you’re using cherry pie filling, drain the cherries and cut them into smaller pieces if desired. If you’re using fresh cherries, chop them into bite-sized chunks.
• Fold the cherries into the cream: Gently fold the chopped cherries into the whipped cream. This will create a deliciously creamy and fruity filling for the cake roll.
3. Assemble the Roll Cake:
• Unroll the cooled cake: Once the cake has cooled completely, gently unroll it from the towel, being careful not to crack the sponge.
• Spread the filling: Evenly spread the whipped cream and cherry mixture over the entire surface of the cake, leaving a small border along the edges to prevent spillage.
• Roll it up: Carefully re-roll the cake, starting from one edge and rolling tightly but gently to keep the shape intact. You can use parchment paper or a clean towel to help guide the cake into a tight roll without pressing too hard.
4. Prepare the Topping:
• Whip the topping cream: In a separate bowl, whip the remaining 1 cup of heavy cream until soft peaks form. This whipped cream will be used to frost the top of the roll, giving it a luscious finish.
• Shave the chocolate: Use a vegetable peeler or grater to shave the chocolate into fine curls. These will be used to garnish the top of the cake.
5. Garnish and Serve:
• Top the roll: Spread the whipped cream over the top of the rolled cake, ensuring a generous and fluffy layer for a beautiful presentation.
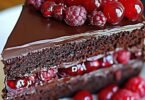
• Garnish with chocolate and cherries: Sprinkle the top with the shaved chocolate and arrange extra cherries artfully on top of the whipped cream. This will add a visually appealing touch and a burst of flavor.
• Chill and serve: Refrigerate the cake for at least 1 hour before serving to allow the flavors to meld and the cake to set. Once chilled, slice and enjoy!
Conclusion:
The Heavenly Black Forest Roll Cake is a delicious, light, and indulgent dessert that brings together the classic flavors of Black Forest Cake in a modern, easy-to-make form. With its soft chocolate sponge, creamy cherry filling, and luxurious whipped cream topping, it’s a perfect treat for any celebration or just a sweet indulgence. The combination of textures and flavors makes every bite a little piece of heaven.